Radiographic guides and surgical guide stents for dental implants: Laboratory fabrication techniques
It is almost standard routine in treatment planning to use tomographic imaging with radiographic guides and surgical guide stents during placement of dental implants. This article describes simple laboratory techniques to fabricate guide stents that can be used during imaging and then easily converted for use during dental implant surgery.
DENTAL IMPLANTShave become a much more common treatment modality for a variety of clinical situations.The success rate and predictability of implants have improved dramatically in recent years.It has become almost a standard routine in dental implant treatment planning to use tomographic imaging techniques with radiographic guides and surgical guide stents during implant placement surgery.
The purpose of this article is to describe simple laboratory techniques for the fabrication of guide stents that can be used during imaging and then easily converted for use during actual dental implant surgery. The position and angulations of implants should be determined prior to dental implant surgery based on several factors, primary of which is the eventual occlusion on whatever type of prosthesis is supported by the implants. This discussion will be confined to the partially edentulous case to be restored via fixed crown and bridge techniques.
In such a case, the occlusion demands that the implants be placed in the correct buccolingual and mesiodistal positions, and at trajectories that will allow masticatory forces to be applied along or as close to the long axes of the implant fixtures as possible. Options for dental implant placement may be limited by the bony morphology of the patient, which may or may not be addressed by bone grafting techniques, or may require less-than-ideal site selection for the fixtures. Thus, it is crucial to disclose this information via presurgical tomographic imaging to supplement the information gleaned from standard-plane x-rays.
The following descriptions and illustrations outline techniques for both nonrestrictive and restrictive combination radiographic guides and surgical guide stents. The stents were made on a stone cast produced from alginate impressions of an actual partially edentulous patient.
Fabricating the radiographic guide
- The proposed implant locations have been marked (figure 1). The cast is then mounted on an adjustable surveyor table, and parallel holes are drilled into the stone at the proposed desired angles with a 2-mm carbide drill bit mounted in a Dremel Mototool on a drill press (figures 2 and 3). Block-out wax is applied to undercut areas.
- Sections of the wooden shaft of a cotton-tipped applicator are inserted into the holes in the cast (figure 4), to which boxing wax is applied to form the rough borders of the stent. After application of an appropriate separating medium such as petrolatum, a salt-and-pepper technique is used to create the stent from clear orthodontic acrylic (figures 5 and 6). The entire cast is then placed into a pressure pot and left to fully cure (figure 7.)
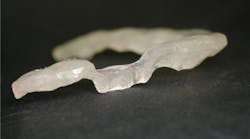
- The stent is carefully removed from the cast, trimmed, and polished, including removal of the wooden shafts. Gutta-percha is warmed and compacted into the channels left after removal of the wooden shafts. A coat of an appropriate acrylic sealer is applied to provide a finished surface, and the stent is ready to deliver to the patient for the tomographic imaging appointment (figure 8).
Converting the guide to a surgical stent
- The gutta-percha is removed from the guide.
- Acrylic is trimmed from the buccal aspect of the stent to leave notches or indentations at the sites of the rods (figure 9). This allows the surgeon to place the initial drill into the indicated positions from a buccal approach, requiring less intermaxillary space for initial drilling, but still offers accurate locations for the implant pilot holes.
- Acrylic is also removed from the occlusal aspect in the implant site areas to create a configuration similar to a “saddle” (figure 10). This further allows the surgeon better visibility and helps accommodate the handpiece head’s fairly large size. Care must be taken to leave enough occlusogingival height to guide the angulations of the initial drills.
- This stent leaves the surgeon more freedom in positioning the implants.
Restrictive guide stents
To create a more restrictive guide stent, the same technique is used with the exception of steps No. 2 and 3 above:
- The gutta-percha is removed from the acrylic stent, but steps No. 2 and 3 above (forming the “saddle”) are omitted.
- This leaves 2 mm-diameter holes through the height of the stent.
- The surgeon is restricted to introducing the pilot drills through these channels.
Potential drawbacks with this method are: (1) drill access is more difficult for the surgeon, and (2) there is a greater risk of creating acrylic filings during surgery, which could contaminate the surgical site.
David L. Brown, DDS, has practiced general dentistry for 38 years in Bedford, Texas. A 1979 graduate of the University of Texas Dental School in San Antonio, he completed the preceptorship in dental implantology there in 1998. Dr. Brown is also a member of the Seattle Study Club and other organizations, and he has invented and patented a device used in implant and complex restorative treatment.
